Minecraft is a game I’ve been playing a lot since my childhood, either in singleplayer or sometimes in multiplayer too. Lots of people wanting to play multiplayer often rent a server or install insecure and useless VPN applications like Hamachi. Renting a server is probably the best option if you have lots of players playing at different times, but can get expensive too. If you just want to play together with friends, you can set up your own dedicated server quite easily.
First, you need to download a server jar. You can use this site to choose your version (you
probably want the latest stable release, in my case 1.16.5), but make
sure you download the server and not the client jar. Once you have
those, create a server folder somewhere and put it there. I will use
./server/ as an example directory.
Next, you want to create a startup script. The server needs to be run using java and you need to pass multiple options to set things like the amount of RAM. This script allows you to simply click on it to start your server.
(Windows users should choose a file name ending with
.bat and macOS/Linux users one ending with
.sh, but the script should work the same for both)
java -Xmx2048M -Xms 2048M -jar server.jar noguiRun the script once to create the initial files. You first need to
change eula=false to eula=true inside of
eula.txt. You can then proceed to edit the
server.properties file which contains all of the server
settings. You should change world generation settings like
allow-nether or generate-structures to
configure the world to your liking. I also recommend to set
spawn-protection to 0 and white-list as well
as enforce-whitelist to true. You should also add yourself
to the whitelist using the whitelist add <name>
command in your server console. You can then rerun your startup script
to finish the world generation and initial server startup.
To test out whether your server works, start minecraft and connect to localhost:25565. You can change the port to be something else than 25565, but we will leave it for the time being. If you land in a new world and the server shows a player with your name connected, the server is working properly.
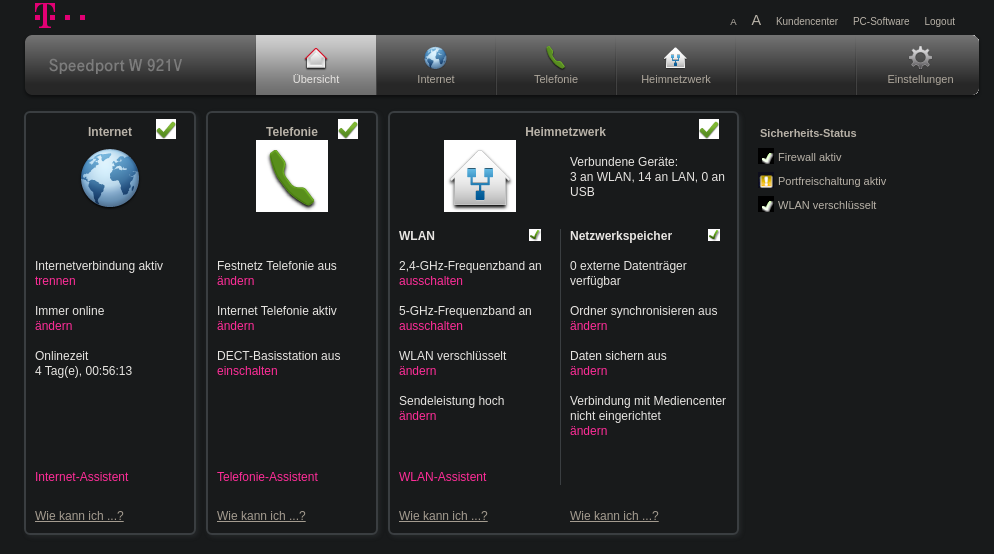
The last part you need to take care of if you want others to be able to join your server is opening your server port. This is done via your router’s web interface which differs for each one. I will use mine as an example.
You first need the local IP address of your router. For Windows 10,
you can open a console window, enter ipconfig and find the
value next to default gateway. For Linux you probably
already know how to do it, but in case you don’t, enter
ip route in your terminal of choice. Your router’s IP
address is next to default via.
Enter this into your web browser and log in to your router using it’s password. It can usually be found physically on the back of your router.
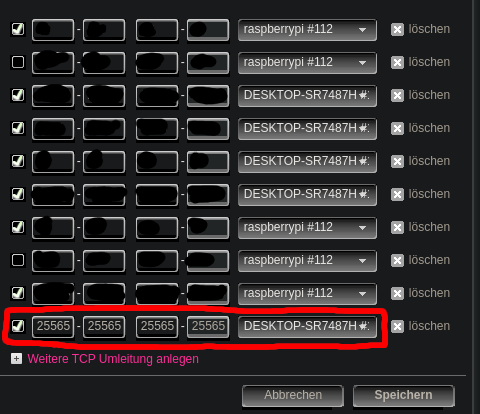
Then go to Internet -> Portfreischaltung (port redirection) and
add a new TCP entry. You need to redirect the port in your
server.properties file (default 25565) to your current
computer. If you don’t know which one is your computer, manually check
its name or its IP.
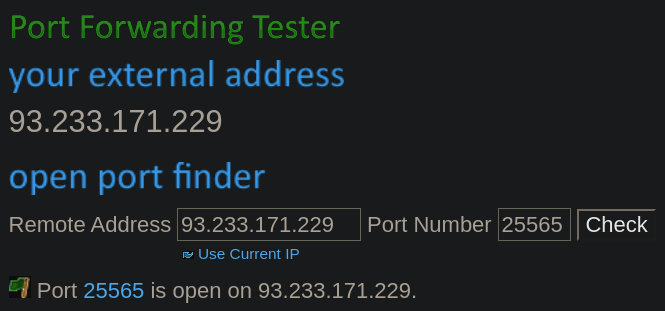
People from outside should now have access to your server. You can check yourself using this website. Enter your port in the port number field, click on check and it should show that the port is open. You can also give the remote address to your friends since this is the one they will be connecting with. If you just want your public IP address, you can use ifconfig.me.
People should now be able to connect to your server. Your public IP might change from time to time, so if there are any connection problems recheck your IP address and give out the new one. You can also use a dynamic IP service such as noip for a free dynamic DNS.